How to Send WhatsApp Flows Form Directly from Website Using Webhook Workflow
Easily send WhatsApp multi-step flows (forms) directly from your website using Webhook Workflow in Acele. Whether it’s a form submission on your WordPress, Elementor, or any custom HTML site, you can instantly trigger WhatsApp messages like lead qualification flows, confirmations, or onboarding forms with no manual follow-up required.
This is perfect for real-time engagement, especially when you want to auto-respond to website visitors on WhatsApp.
What You’ll Achieve
By the end of this guide, you’ll be able to:
- Send a WhatsApp Flow to a user’s phone number automatically when they submit a website form
- Connect any form tool (like WPForms, Elementor, Contact Form 7, or custom HTML) with Acele
- Auto-map the submitted form data to WhatsApp Flows Form using Webhook Workflow
- Track and personalize every submission with dynamic bot replies
Prerequisites
- A verified WhatsApp number connected to Acele
- At least one WhatsApp Bot Flow already created
- A form on your website that collects the user’s WhatsApp phone number
- Access to edit your form’s settings or use a webhook
Configuration
Step 1: Create WhatsApp Flow
Create a WhatsApp Flows Form first. If you’re not sure how, refer to the setup guide inside Acele (Click here to learn more).

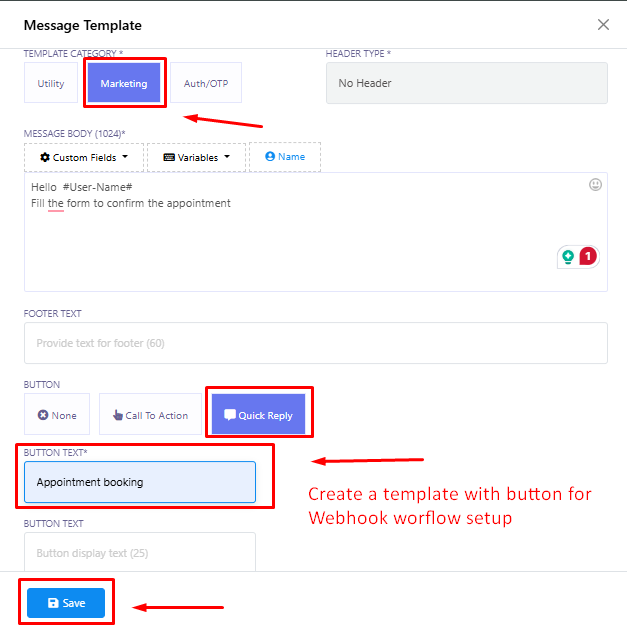
Step 2: Create WhatsApp Template
Create a WhatsApp marketing template with a CTA or quick reply button.
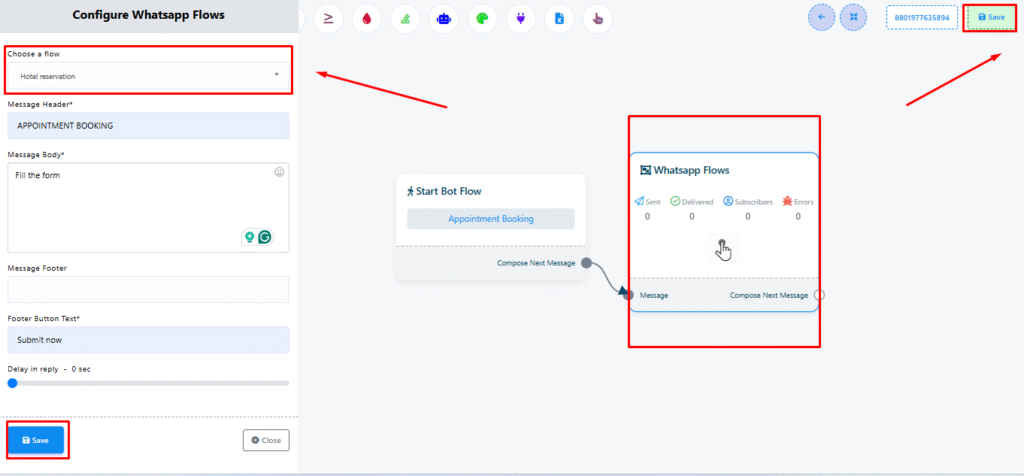
Step 3: Create Bot Flow
Now create a bot flow using the WhatsApp Flows Form.
- Go to Bot Manager → Create
- You’ll be taken to the visual flow builder
- Double-click the Start Bot Flow block and add a title
- Drag in the WhatsApp Flows Form component and configure it
- Select the WhatsApp flow created in Step 1
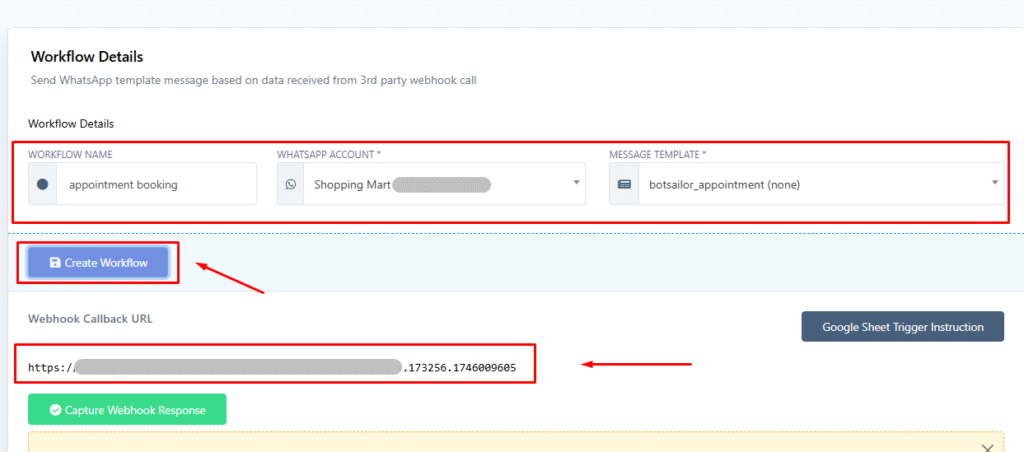
Step 4: Create Webhook Workflow
- Navigate to WhatsApp → Webhook Workflow
- Click Create New Workflow
- Enter:
- Workflow name
- WhatsApp account
- WhatsApp template created in Step 2
- Click Create and copy the generated webhook URL
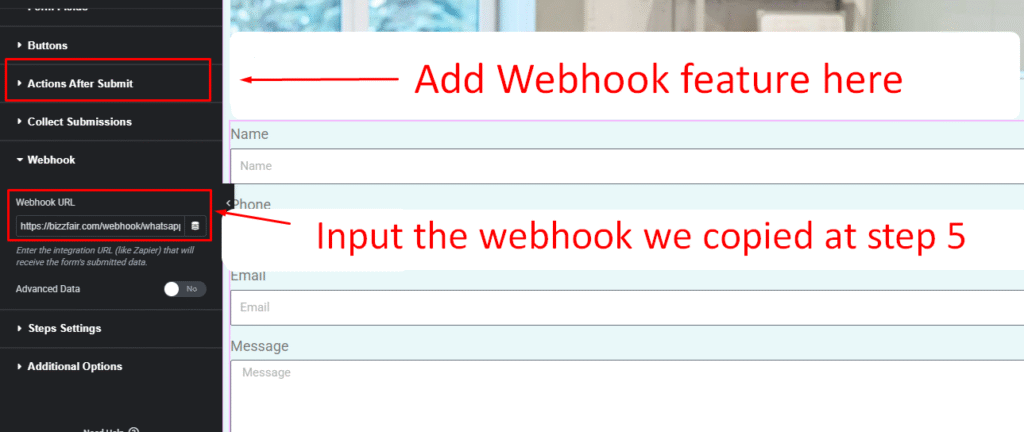
Step 5: Add Webhook in Elementor Form
- Go to Dashboard → Elementor → Elementor Form
- Under Actions After Submit, add
Webhook - Paste the copied webhook URL
- ✅ Ensure your form includes all the variables needed by the WhatsApp flow (name, phone, email, etc.)
If needed, refer to the Elementor integration blog (Click here).
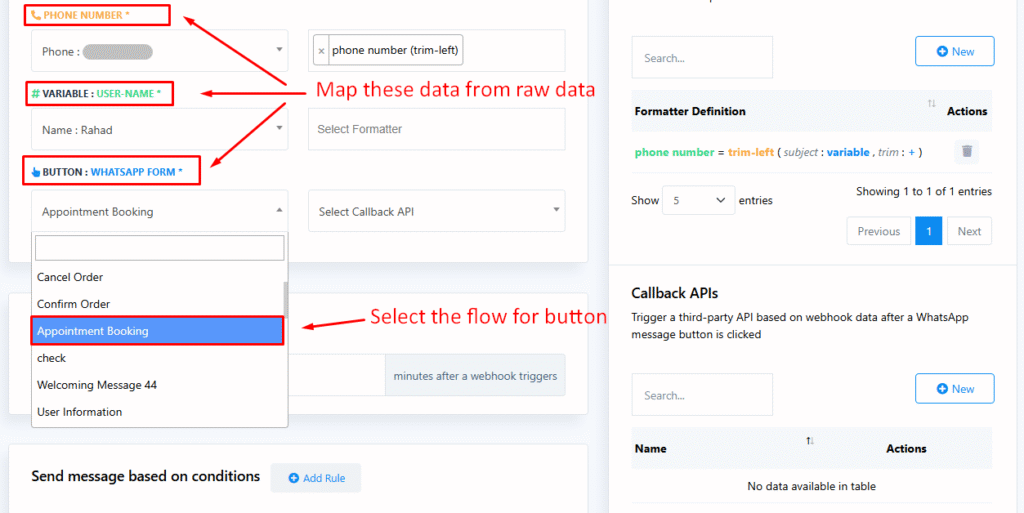
Step 6: Capture and Map Webhook Response
- In Acele → WhatsApp Webhook Workflow, select the webhook created
- Submit a test form entry to capture raw data
- Map fields (e.g., name, phone) to your WhatsApp flow variables
- Attach the bot flow created in Step 3
- Click Save
✅ Once done, the WhatsApp flow will be automatically sent when the form is submitted. You can even delay delivery using a Delay Block in the bot flow.
Troubleshooting
If anything fails, check the full [WhatsApp Flow Setup Error & Troubleshooting Guide] for common issues and resolutions.
Example Use Cases
- Lead Generation: Send a qualification flow instantly after a landing page submission
- Appointment Booking: Auto-send a confirmation or calendar booking flow
- Sales Inquiry: Start a chat when someone submits a contact form
- Order Confirmation: Trigger WhatsApp-based order confirmation post-checkout
FAQs
What is the purpose of Webhook Workflow in Acele?
It lets you auto-trigger WhatsApp flows when users submit forms on your website, without needing to follow up manually.
Can I use this with any form builder?
Yes — Elementor, WPForms, Contact Form 7, Gravity Forms, and even raw HTML forms.
Is a WhatsApp template required?
Yes. It must include a CTA or quick reply to trigger the flow, especially for contacts outside the 24-hour window.
Is a phone number required in the form?
Yes. It should be in international format (e.g., +91XXXXXXXXXX).
Can I send flows to unsubscribed users or cold leads?
Yes — via an approved WhatsApp template with a CTA button.
Why is my flow not triggering?
Check for:
- Incorrect webhook URL
- Improper phone number format
- Missing mapping or flow in webhook workflow
- Missing CTA in the template
Can I delay the WhatsApp flow after submission?
Yes — use a Delay Block in your bot flow.
Where do I map form fields?
In the webhook workflow panel inside Acele, after submitting test data.
Can flows be personalized?
Yes — use dynamic fields like {{name}}, {{email}}, {{service}}, etc.
Can I track form submissions?
Yes — all data is:
- Stored under the Subscriber Manager
- Logged in Custom Fields
- Optionally synced with Google Sheets